Building SASS And SCSS In Sublime Text
During the last couple of months, I have been delving into the world of SASS/SCSS, and as a result SASS/SCSS has become a frequently used tool in my personal projects; and has also featured in the tutorials I have been sharing here on Codesmite.
However, I have one major pet peeve with SASS/SCSS. I like to use as few programs as possible to streamline my workflow and I am a huge fan of Sublime Text. I use it for almost everything programming related. Unfortunately, by default, Sublime Text is incompatible with SASS/SCSS syntax.
In this article I will show you how to quickly and easily configure Sublime Text for syntax highlighting SASS/SCSS, and also how to compile SASS/SCSS files into raw CSS from within Sublime Text.
SYNTAX HIGHLIGHTING
Having easy to read code that can be quickly skimmed through can greatly improve workflow, especially when hunting for
that elusive semi-colon that is causing compiling errors.
The example below, showing SASS in Sublime Text with the
default CSS syntax highlighting is visually quite undesirable:

Fortunately, there is a very useful package available for Sublime Text that adds support
for SASS/SCSS syntax highlighting and tab code completion.
You can find the Github repository here:
https://github.com/nathos/SASS-textmate-bundle
Alternatively, an even simpler way to install the package is to use the built-in Sublime Package Control.
INSTALLING WITH SUBLIME PACKAGE CONTROL
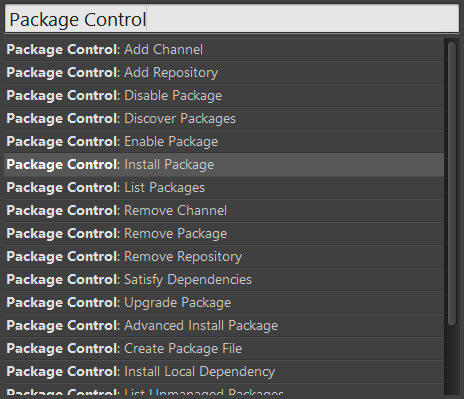
- From inside Sublime Text press: CTRL + SHIFT + P (Command + SHIFT + P for Mac users), this will open the Sublime Command Palette.
- Type Package Control into the input box to narrow the selection, then select Package Control: Install Package from the list.
- Sublime will take a moment to retrieve the list of available packages.
-
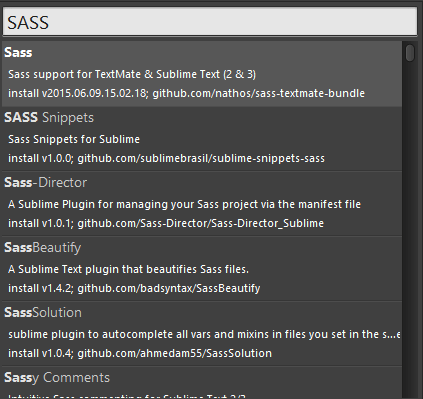
When the list of available packages appears, type SASS into the input box to narrow the selection and then
select SASS – SASS Support for TextMate & Sublime Text (2 & 3).
The package will now install automatically.

SELECTING SASS/SCSS SYNTAX HIGHLIGHTING
An option for SASS is now selectable from the syntax menu, this can be found by clicking the currently selected syntax located at the bottom right of the Sublime UI.


The syntax highlighting on SASS/SCSS files is a lot more desirable and easier to
read now that Sublime Text understands the syntax:

OVERRIDE HAML DEFAULTS
When opening a file with SASS or SCSS extension Sublime Text defaults the file extension to Ruby HAML syntax highlighting. This default behaviour can be easily overridden by opening the syntax menu and selecting the SASS option in the drop down from the Open all with current extension as… option found at the top of the list.

THE THEME I USE
If you like the colours of the theme used in the examples, you can find it within Sublime Package Control by searching for Predawn Monokai. It is a modification of Flatland Monokai theme with the dark UI elements of Predawn.
BUILDING SASS/SCSS IN SUBLIME TEXT
Sublime Text now recognises SASS/SCSS syntax, it would be even better if it could also perform build operations on SASS/SCSS code directly from Sublime Text without having to open another program or Console Window.
There is a package for Sublime Text that does exactly that.
Which can be found on Github here:
https://github.com/jaumefontal/SASS-Build-SublimeText2
Package Prerequisites:
Windows users will first need to install Ruby.
The installation can be located here: http://rubyinstaller.org/downloads/
OSX and Linux Operating systems include Ruby by default and require no further installation.
INSTALLING WITH SUBLIME PACKAGE CONTROL
- From inside Sublime Text press: CTRL + SHIFT + P (Command + SHIFT + P for Mac users), this will open the Sublime Command Palette.
- Type Package Control into the input box to narrow the selection, then select Package Control: Install Package from the list.
- Sublime will take a moment to retrieve the list of available packages.
-
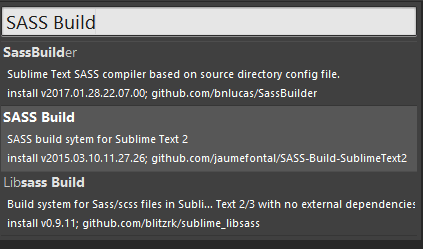
When the list of available packages appears, type SASS Build into the input box to narrow the selection and then
select SASS Build.
The package will now install automatically.


Once the package is installed there will be two new options: SASS and SASS – Compressed in the build systems, located at Tools > Build Systems from the navigation bar.

The SASS build option will output a compiled CSS file that preserves the layout and whitespace of your SASS/SCSS file.
Alternatively, the SASS – Compressed build option will output a minified CSS file that removes: comments, whitespace and the semi-colon of the last rule in each block, as none of these are required to be valid CSS.
To start the build select Build from the Tools menu or press CTRL + B (Command + B for Mac Users) while a SASS/SCSS file is open.
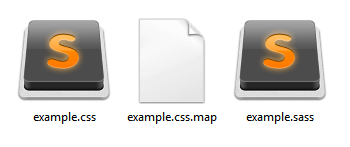
Once the build is complete a compiled CSS file and a CSS Map file will be created in the same folder as the source SASS/SCSS file, as shown below:

Summary
Using only two easy to install packages, we are now able to write SASS/SCSS code in Sublime Text with readable, highlighted syntax; and can also run a custom build that will turn SASS/SCSS code into compiled CSS. There are many packages available for Sublime Text that can improve functionality and workflow, making Sublime Text an even more powerful tool for programmers.
Have a favourite Sublime Text Package that improves your workflow? Let us know in the comments below; we would love to check it out.


